
QuickBooks 1099 Vendor Setup
- Setting Up 1099 Vendors in QuickBooks for Mac
- Setting Up 1099 Vendors in QuickBooks for Windows (Pro, Premier, Enterprise)
Setting Up Vendors for 1099 in QuickBooks Online
If you have already setup your vendors on QuickBooks Online, follow the steps below to set them up for 1099. If you have not set them up on QBO, see How to Setup your Vendors on QuickBooks Online.
A 1099 is to be prepared for all contractors and non-employees that you have paid $600 or more within the tax year. With the exception of Corporations, all individual contractors and LLC's who are within the $600 threshold, must be issued a 1099. A form 1096 must also be prepared and sent with the IRS 1099 copy forms, as a summary sheet. There are two general deadlines: 1) January 31st, following the year you are preparing 1099's for - must issue 1099's to all qualified recipients by this date. 2) February 28th, following the year you are preparing 1099's for - must send forms 1099 along with a form 1096 to the IRS by this date.
To Prepare and Print 1099's in QuickBooks Online:
You will need to do this in two (2) steps:
STEP 1. Setup Vendors for 1099:
Step 1. Go to Vendors in left menu bar, and double click on the vendor to open for edit.
Step 2. Click Edit at top right of screen, and insert the vendors tax ID number at Tax ID and check the box below Track payments for 1099. (You may want to make sure that the vendor addresses are current and accurate. You should have sent out W9 forms to each eligible vendors prior to year end, asking them to complete, sign and return the form to you. This is very important, as the form will contain the correct address and tax information. It will also allow you to see if they are a corporation, and therefore exempt from 1099.)
Step 3. Click Save.
STEP 2. Map 1099 Vendors to Accounts:
Step 1. Go to Vendors in left menu bar, click on Prepare 1099s at top right of screen, then Let's get started or Continue your 1099s, if you have already started setting it up in the past.
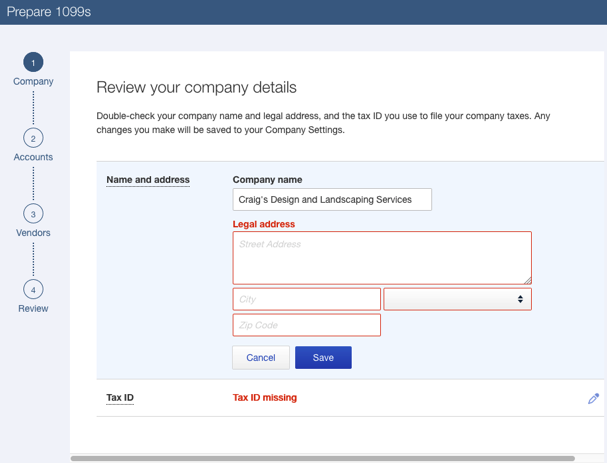
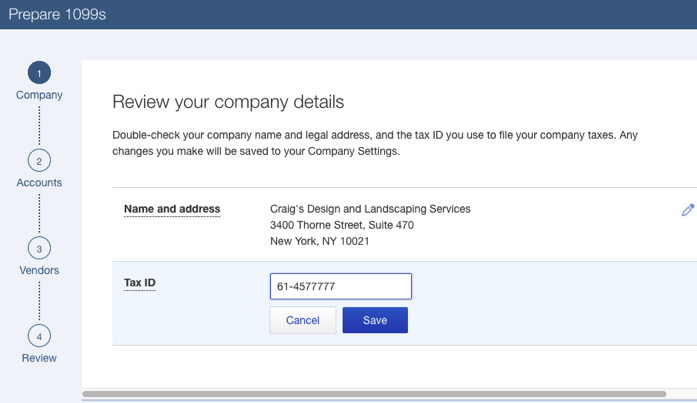
Step 2. If you have already gone through the setup process, your company name and tax ID number should already be populated in this section. If not, go ahead and enter your company's address and tax ID number. (You will need to click Save in one section before you can move to the next section. Click the pencil icon at right to edit the tax ID, or Address area.)
BEFORE:
AFTER:
Step 3. Now, click Next and check the box that corresponds with the type of compensation you made. The most common is Box 7: Nonemployee compensation. (Like I tell my clients, when in doubt, use box 7. The most important thing is to ensure you issue and file 1099's for all qualified monetary recipients within the threshold).
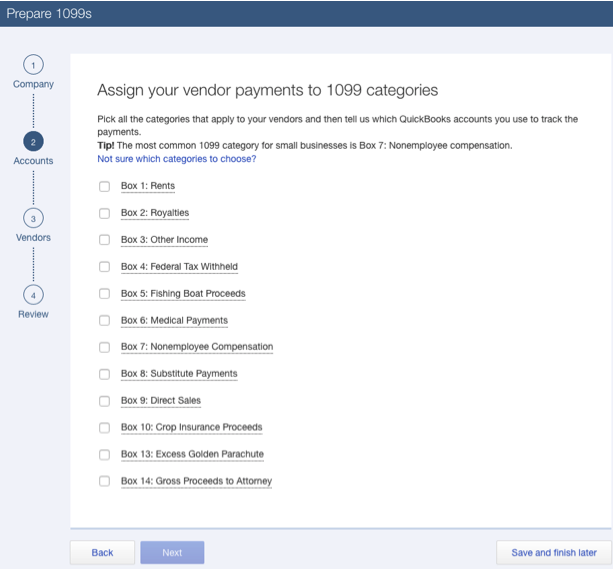
Step 4. Now click the dropdown at Choose an account, and check the boxes to the left of all the accounts that relates to the vendors who qualify for a 1099 (as shown in the screenshot below).

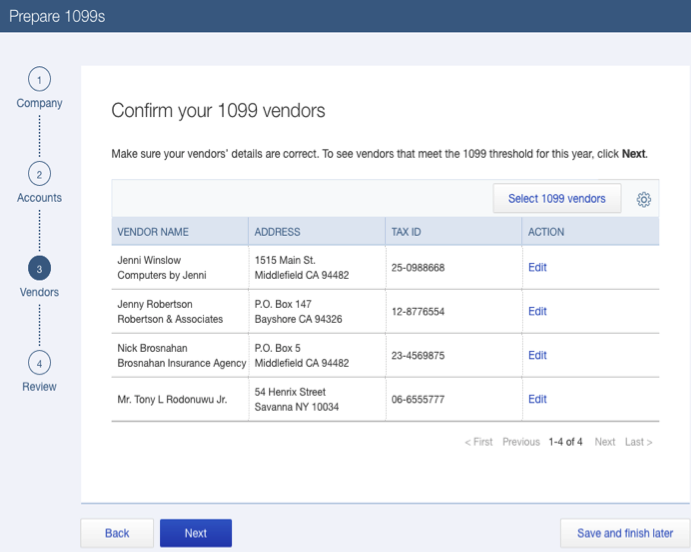
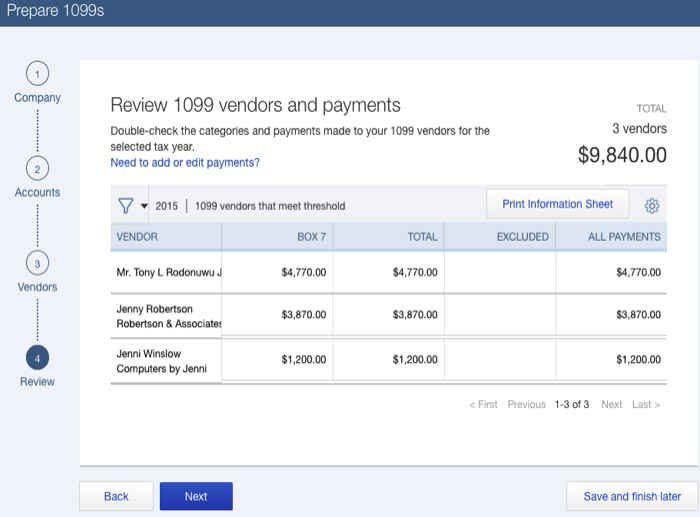
Step 5. Click Next (This section will show you all the vendors that you have setup for 1099's as shown in screenshot below).
Step 6. Click Next again. (This section will show you the vendors who are within the qualified threshold, and thus eligible for 1099 for this period (as shown in screenshot below). (NOTE: It is always important to have a vendor summary list on hand with the eligible vendors noted. If you get to this point of the 1099 process and you do not see some vendors included for 1099, it means that you did not check off their account during the mapping phase. You can use the Back button at any time to go back to add accounts you use for the vendors and make other corrections).
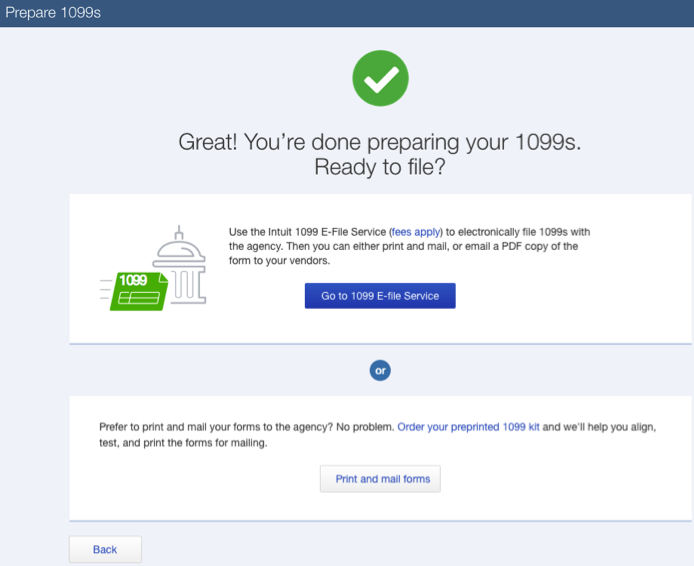
Step 7. If all looks okay in this section, click Next. You will now be taken to the "Hooray" screen as I call it, where you can either click Go to 1099 E-file Service to allow Intuit to efile your 1099's for you for a fee. Or you can click on Print and mail forms to print and mail them yourself. (Please note that you cannot print and mail them on regular printing paper, there are specific preprinted forms designed for this purpose. You can get them at office supplies stores such as Staples and Officemax. There are a variety of the same form available - meaning, some of them are designed to be used in laser printers (single sheets), while some are multi-sheets designed for typewriters etc.)
Step 8. Follow the instructions and print your form on plain paper, then check it against the preprinted form to see if they are in alignment. If they are, very good. If not, follow the troubleshooting tips below from the Step you are now at. It may take you a while to get it right. If you get frustrated with this section, you can go back and select the option to allow Intuit to E-file them for you for a fee, as long as you are within the deadline.

Troubleshoot 1099 Print Alignment Issue:
If you are having issues printing your 1099's, here are a few steps to help correct this:
Step 1. Click Vendors on the left hand navigation bar, then at top right, click on the Prepare 1099’s
Step 2. Scroll down to Section 3 and click on View preview and print sample. (Note: You will want to have plain paper in your printer for the following test. Once printed, you can hold this printout against your preprinted 1099 form to make sure everything lines up correctly. If it does not line up correctly, click No it doesn't line up.
Step 3. In the Fine-tune alignment Section 2; set the Vertical and Horizontal fields to "0" if they are not. If it is still not aligned, you will need to play with the horizontal and vertical number until it is aligned. It is usually aligned at "0.
Step 4. When it's properly aligned click Next, then Next to print.


.png)